Clone host pools and host pool settings
Nerdio Manager allows you to clone existing host pools or just the host pool settings that can then be applied to other host pools.
Clone host pools
If you clone a host pool, this creates a new host pool based on an existing one, cloning all its customizations. Therefore, there is no need to reconfigure the environment from scratch.
The clone feature allows you to create several template host pools. These configurations contain no actual hosts and provide no desktops to users, but they provide setups for the future host pools and their environments. You can clone them according to your requirements when you need to deploy new capacity.
To create a new clone host pool:
-
Locate the host pool you wish to clone.
-
-
Classic UI: From the action menu, select Clone Configurations.
-
New UI: Select the more options
 menu, and select Clone Configurations.
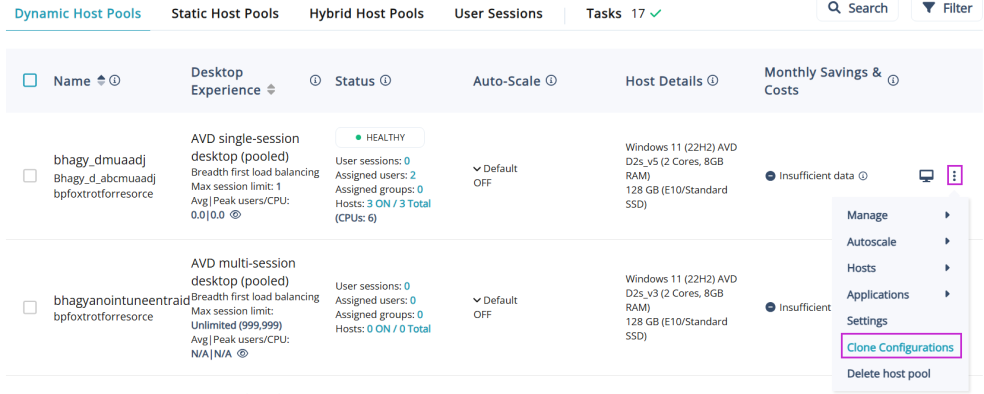
-
-
In the Clone Host Pool Configuration dialog box, enter the following information:
-
Source Host Pool: From the drop-down list, select the source host pool.
-
Destination Workspace: From the drop-down list, select the workspace you want to use.
-
Resource Group: From the drop-down list, select the resource group to contain the VMs.
-
New Host Pool Name: Type the host pool's name.
-
Friendly Name: Type the friendly name that is visible to end users.
-
Description: Type the description visible to admins.
-
New Host Name Prefix: Type the unique prefix for the VMs to be used when creating multiple session hosts.
Note: This must not be the same as any existing host pools. The name prefix limit is 10 valid, Windows computer name characters. When using a prefix, the system automatically appends “-xxxx” to the name prefix to make a unique name. Do not add “-“ to the name prefix.
-
Copy users and group assignments: Select this option to copy the users and groups assigned to this host pool and paste them into the clone.
-
Use new Custom app group names: Select this option to specify a new custom app group name.
-
Custom App Group Name: Type the new custom app group name(s).
-
-
-
When you have entered all the desired information, select Clone.
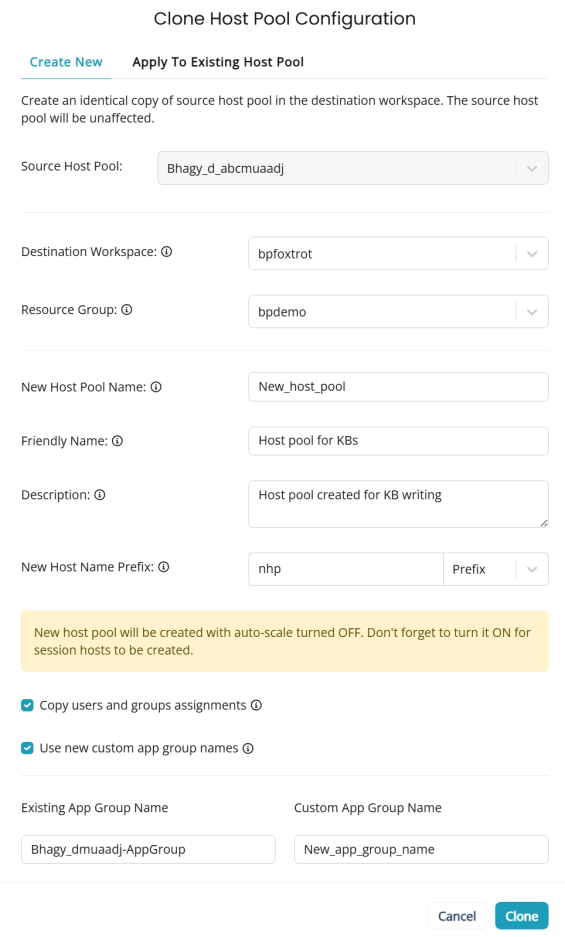
A copy of the existing host is generated with a different name and a different VM prefix. The new cloned host pool is added to the list of the existing host pools.
Note: By default, the auto-scale option for this host pool is off. Do not forget to turn it on. See Enable dynamic host pool Auto-scaling for details.
Tip: To delete the existing host pool, refer to Delete Hosts, Host Pools, and Workspaces.
Clone host pool settings
If you clone host pool settings, this allows you to apply just the settings of the selected host pool, and apply them to another host pool.
To apply settings to an existing host pool:
-
Locate the host pool you wish to clone the settings from.
-
-
Classic UI: From the action menu, select Clone Configurations.
-
New UI: Select the more options
menu, and select Clone Configurations.
-
-
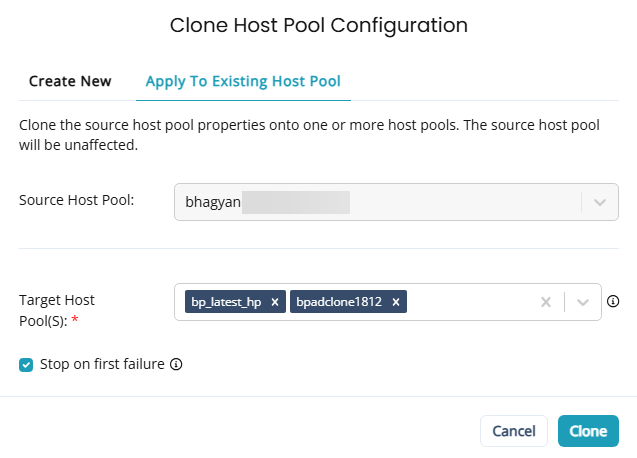
In the Clone Host Pool Configuration dialog box, select the Apply to Existing Host Pool tab.
-
Enter the following information:
-
Source Host Pool: From the drop-down list, select the source host pool. This is the host pool from which you want to clone the pool settings from.
-
Target Host Pool(s): From the drop-down list, select the target host pool(s). This is the host pool(s) that you want to clone the settings to.
Note: The list of available host pools is filtered based on the source host pool. Only host pools of the same type - Static, Dynamic, or Hybrid - are shown. You can also select multiple target host pools.
-
Stop on first failure: Each host pool is processed separately. This option will cancel remaining operations on the first failure.
-
-
Select Clone.